The Exubia Guide to Plant Care
Everything you need to know about plant care, wrapped up into one simple guide.Water
When should I water my plant?
Because there are so many variables that influence how much water a plant needs, watering on a schedule is a dangerous game.
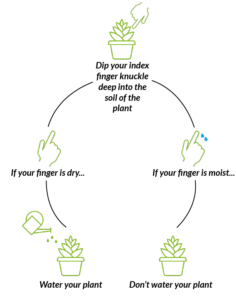
The best approach is to use the finger dip test which will allow your plant to access water as and when it needs it, rather than using a schedule where some weeks the plant may be overwatered and some weeks it may be underwater.
The finger dip test is a simple way to test the moisture level of your soil daily. It involves placing your index finger knuckle deep into the soil of your plant every day.
If your finger is dry when you pull it out then your plant needs more water. If it’s even slightly moist then you can leave it for another day.
What type of water should I use for my plant?
 Tap Water: For 99% of indoor plants, this is the perfect choice.
There are a few more delicate plants like the Prayer Plant that may prefer rainwater, however.
 Rain Water: Due to its lack of hard elements and its neutral P.H. – rainwater is a great choice for sensitive plants.
Unfortunately, it can also be quite a time-intensive activity so we’d only recommend it for the plants that really need it.
 Distilled / Deionised Water: A bit like tap water, this a perfectly suitable option for all but a few extremely delicate plants – however it is more costly in terms of both time and money.

Boiled Water: Using boiled water can be a risk as it can scorch or even kill your plant if insufficiently cooled.
 Softened Tap Water: The softener salts will be absorbed by the soil and the excess sodium may subsequently damage or kill your plant.
What is the best way to water my plant?
Plants can only effectively use water through their roots which means it’s best to water the soil at the base of your plant rather than watering the foliage.
It’s also important to remember that as you water your plant – the soil becomes gradually more compact.
In areas where the soil becomes more compact, there is less space for water to seep in through, which as a result can mean that water does not flow freely to the roots of the plant.
When plants are outdoors, insects crawl through the soil naturally breaking it apart.
Unfortunately, indoors this won’t happen. Therefore, you may need to compensate for the lack of insects.
Simply piercing the soil with a small sharp implement such as a chopstick is a brilliant way to break up the soil.
Consequently, allowing water to flow freely to the roots of your plant.
Is humidity important?
The higher the humidity in your space, the less you will need to worry about watering.
This is because it’s easier for water to evaporate from your plant into drier air than humid air.
Therefore, if humidity is low – your plant will lose water more quickly which, unfortunately, will also lead to your plant becoming dehydrated quicker.
If you’re doing the finger dip test daily and providing sufficient water for your plant on a regular basis then you can combat the effects of low humidity but we’d suggest trying to keep humidity within a normal range where possible.
Is misting important?
Scientific literature has shown that misting is a very ineffective & short-lived way of providing humidity for plants.
On top of that, misting plants with hairy leaves or succulents can be incredibly counter-productive.
For plants with hairy leaves, the moisture can get trapped, leading to rot.
Equally, for succulents which are adapted to a dry environment – this excess moisture can contribute to overwatering.
With that being said it can be a useful way to help unfurl leaves and if you enjoy the process then there’s no reason not to carry on misting plants with waxy leaves.
However, for those who find plant care a bit of a chore, there’s no reason to add another thing to the to-do list.
Light
How do I pick a spot for my plant?
A bit like with water, each plant requires a specific amount of light to thrive.
Unfortunately, though, there is no clear rule of thumb to know when your plant is in a good position or bad position.
Traditional plant maintenance guides are notorious for using terminology for lighting such as “bright indirect light”.
Unfortunately, this language is fairly ambiguous and it often leaves plant owners incredibly confused.
A better way to decide where to place your plant is by evaluating the foot candles (FC) of a specific location.
Measuring light in foot candles helps to give a tangible & accurate picture of how much light a plant gets on average over 24 hours. It is also incredibly easy to calculate and track.
How do I tell how much light that spot gets?
Although there are many expensive, professional tools on the market, for plant hobbyists, downloading and using one of the many free apps on the market is probably the easiest and most cost-effective way to measure the light in your space.
After downloading one of these apps, all you’ll need to do is point your camera at the spot where you have placed your plant and the app will tell you how much light it is receiving.
How much light does my (insert plant species) need?
Below are the light levels needed to keep a number of the most common plant species happy and healthy.
Aglaonema Silver Bay – 200 foot candles
Air Plant – 400 foot candles
Anthurium Ellipticum – 400 foot candles
Alocasia Zabrina – 400 foot candles
Aloe Vera – 800 foot candles
Areca Palm – 400 foot candles
Aspidistra Elatior – 200 foot candles
Begonia Maculata – 400 foot candles
Birds Nest Fern – 200 foot candles
Boston Fern – 200 foot candles
Croton – 800 foot candles
Dracaena Marginata – 200 foot candles
Dracaena Reflexa – 200 foot candles
Echeveria – 800 foot candles
Euphorbia – 800 foot candles
Ficus Benjamina – 800 foot candles
Ficus Cyathistipula – 800 foot candles
Ficus Elastica – 800 foot candles
Ficus Lyrata – 800 foot candles
Ficus Robusta – 800 foot candles
Hoya Kerii – 200 foot candles
Nerve Plant – 200 foot candles
Hedera Helix – 400 foot candles
Jade Plant – 400 foot candles
Maidenhair Fern – 200 foot candles
Monstera – 400 foot candles
Norfolk Island Pine – 400 foot candles
Prayer Plant – 200 foot candles
Parlour Palm – 400 foot candles
Peace Lily – 200 foot candles
Peperomia – 200 foot candles
Philodendron Scandens – 200 foot candles
Pothos – 200 foot candles
Sanseveria – 200 foot candles
Schefflera Arboricola – 200 foot candles
Spider Plant – 400 foot candles
Staghorn Fern – 400 foot candles
Strelitzia Reginae – 800 foot candles
Yucca Elephantipes – 800 foot candles
ZZ Plant – 200 foot candles
Why is dusting important for light?
Dusting is a vital component of plant maintenance as it’s not uncommon for the average plant to gather dust at some point in its lifespan.
Although may seem harmless, a layer of dust can actually block sunlight from reaching your plant and prevent photosynthesis from taking place.
Therefore, it’s best to dust your plants very lightly with a soft paintbrush or duster whenever you see it forming on your plants.
Dusting your plants by misting them and/or wiping them down with a damp cloth is of course an option. Although, the excess moisture can often lead to rot.
As a result – it’s best to avoid using this method on plants with hairy leaves and succulents.
What temperature should I keep my plant at?
Temperature is another key factor when it comes to plant care. Unfortunately, however, the optimal temperature of each plant species varies.
Simultaneously, it’s very difficult to provide different levels of heat to plants in the same space.
Although it may not be possible to deliver the optimal temperature for multiple, individual plant species in the same space – keeping your indoor temperature between 15C-25C will ensure that all of your indoor plants are safe from freezing or scorching.
Nutrition
Why should I fertilise my plant?
Besides water & light, the other variable that is vital for plant maintenance is nutrition.
The three main nutrients that plants require are Nitrogen (which serves to support foliage & stem growth), Phosphorus (which serves to support root growth) and Potassium (which serves to support cellular function) e.g. temperature tolerance, pest resistance and water usage efficiency.

In addition to the above, there are a whole host of nutrients that support a number of other functions including Calcium, Sulphur, Magnesium, Iron, Nickel, Molybdenum, Boron, Chlorine, Manganese, Zinc, and Copper.
Over time, all of these nutrients get depleted if they’re not replenished – in the exact same way the water in a plant’s soil gets depleted over time.
So, how do you combat this loss of nutrients? Although there are a few methods – the most common and efficient route is to replenish key nutrients with fertiliser.
What should I fertilise my plant with?

The large majority of fertilisers are differentiated by their N (Nitrogen), P (Phosphorous), K (Potassium) ratio.
Although agricultural crops & outdoor plants have varying requirements, there seems to be a scientific consensus that choosing a fertiliser with an NPK ratio of 3-1-2 is an optimal choice for plant maintenance.
It’s important to remember when searching for a fertiliser that, as it’s a ratio, the fertiliser bottle may say something like 6:2:4 or 18:6:12. Don’t be deterred – they all fit under the category of 3-1-2.
How should I fertilise my plant?
One of the trickiest parts of plant maintenance is figuring out how to fertilise your plants.
Most fertilisers will come with specific instructions on how to apply.
Therefore we’d suggest following this guide as all fertilisers vary in strength and what could be too little of one fertiliser, maybe too much of another.
One piece of advice we will give is that it’s best to under-fertilise rather than over-fertilise if the guidance on your bottle is unclear. Over fertilisation will eventually kill your plant.
When should I fertilise my plant?
This is another factor that comes down to the individual characteristics of your plant.
The individual fertiliser instructions will tell you how frequently to fertilise your plant based on its strength.
However, deciding when to start and stop fertilising, will depend on your plant.
If your plant is in an active growth phase and is producing new leaves (usually during spring and summer) then continue to fertilise it.
Alternatively, if it appears that your plant has stopped growing and is in a dormant phase (usually during late autumn and winter) then you can stop fertilising.
Will pruning help my plant get more nutrients?
Pruning plants definitely has an aesthetic benefit but it also serves a very practical function too.
Pruning dead or damaged leaves allows a plant to put all of its resources (nutrition, water & light) into growing new leaves and supporting the function of its existing, healthy leaves.
As a result, it wastes less energy & nutrients trying to revive unhealthy leaves. If you notice your plant has dead or dying leaves – there are two ways to prune your plants:
One way to deadhead your plants involves simply trimming off an individual leaf to ensure dying leaves aren’t consuming any more energy.
Alternatively, you can remove the terminal bud by pruning, pinching, or breaking it off.
The supply of resources is then redirected to the other buds which quickly grow and branch out, resulting in a bushier look to the plant instead of a long spirally growth.
Will repotting help my plant get more nutrients?
Adding fertiliser isn’t the only way to increase the amount of nutrients in your plants’ soil.
Repotting your plant and adding in new soil is another simple route to increase your plants’ nutrition supply.
On top of this, repotting is also a useful strategy if your plant grows too big for its pot and becomes root-bound.
This is unhealthy as the tangled knots of roots will lose access to the nutrients and water in the soil.
It’s easy to identify if your plant needs repotting or is rootbound – simply check whether the roots have visibly grown down through the holes in the drainage pot. If they have grown through the holes – it’s time to repot.
How to repot:
1. Pick a new pot similar to the size of your old pot – moving up in pot size too quickly can result in your plant going into shock.
2. Following this, it’s time to loosen the roots of the plant from your old potting mix and dispose of it.
3. Finally, add your new potting mix into the pot – secure your plant into the new mix and that’s it – you’re finished repotting!
Pests
How do I stop pests feeding on my plant?
One of the largest & most common threats to plants is houseplant pests which will live and feed off your plant.
As a result, we’ve compiled a list of three easy methods that you can use to combat pest infestations…
1. Sticky Pads
Sticky Pads are set up in a few seconds and can catch fungus gnats and other pests directly.
They are effective for up to three months, are completely odourless and contain absolutely no toxins.
How do they work? Flies and other pests are attracted by the yellow colour of the trap and stick to the glue on the pad- allowing you to dispose of them directly.
2, Insecticides
Insecticides can be found at almost any garden centre and provide an easy, convenient way to remove pests from your plants.
Most insecticides come in a spray form that you can either apply directly or apply to a cloth and wipe the leaves of your plants with.
3. Diatomaceous Earth
This compound is made from the ground-up bodies of prehistoric diatomic fossils.
When ground, these tiny oceanic skeletal pieces are very sharp and produce the effect of many miniature razor blades.
It should be noted that although these pieces are sharp, they will not damage your pots as the powder is incredibly fine and the pieces are minuscule.
